To ensure the required water level on the site and organize the removal of excess moisture, special drainage systems are used. Wall drainage of the foundation is the most practical and simple option for these purposes, which you can organize yourself.
Drainage is a system for draining ground or melt water from a site or, on the contrary, ensuring its uniform circulation over a certain area. Wall drainage is a drainage system in which drains are located directly around a residential building or other building, encircling it and ensuring maximum drainage of the foundation and basement.
Photo - wall construction
There are two types of such a wall structure:
- Linear;
- Plast.
The linear device is made throughout the blind area, it is most often open, i.e., the drains are viewed from above. To protect against litter and silting, special metal gratings are used. Its peculiarity is that it is mainly equipped after the completion of the construction of the cottage.
 Photo - scheme
 In country houses located in swampy areas, it is recommended to equip wall-mounted horizontal reservoir drainage. It is also called internal or deep, because by its design it is practically one with the foundation. Its foundation is laid during the construction of a sand or crushed stone cushion for the supporting system of the building.
 Photo - a combination of drainage pipes from the roof and the site
 Calculation and development
As with the installation of sewers, a very important stage of work is the development of a drawing and a project plan. According to SNiP, the following factors will need to be taken into account:
- Drainage depth;
- Width;
- bias.
The depth of the wall outlet according to GOST should be determined by the level of the foundation and the freezing of the soil in the cold season. Mostly, wall drainage is 30-40 mm lower than the base, but the exact figures depend on the type of terrain. If there are a large number of stones in the soil or a reservoir is located nearby, then some deviations from the norm are allowed. Also, this parameter may vary depending on the drainage area and the area of \u200b\u200buse (for residential or industrial buildings, for the purpose of melioration or distribution of moisture along the perimeter of the basement).
 Photo - drawing
 The width of pipes and trenches is a very important indicator, since it determines the efficiency of the entire system. In order to carry out the calculation, it is recommended to contact the surveyors of your region, they will be able to determine the exact level of soil moisture and compare other atmospheric factors.
The slope for wall storm structures is calculated, in most cases, independently. The technology is very similar to the design of the sewer: depending on the width and duration of the system, a gradual slope of 2 centimeters or more is required towards the septic tank. In this case, the distance of the extreme point of the pipe to the prefabricated collector well is of key importance. If the angle is too small, the drainage will begin to silt, and if it is too sharp, then the wells will quickly overflow and it will be necessary to provide them with pumps or regularly pump out water.
The calculation is easy to do yourself. For example, the building has walls 9 and 10 meters long, while the septic tank is 7 meters away from the blind area. Its upper level is located at a height of 20 centimeters above the ground. Each section of the pipe will be 19 meters long (10 + 9), the length of the pipe to the well will be 26 meters (19 - the length of the pipe and 7 - to the septic tank). Based on this, the total slope indicator will be: 52 centimeters (if you start from 2 centimeters of the angle of inclination of the system).
The wall drainage project itself must be checked by a professional builder and surveyor. They will be able to calculate possible shortcomings and correct errors in calculations, which is very important for ensuring dryness in the basement and extending the life of the building.
Video: Drainage and backfilling of the site during do-it-yourself construction
Installation
Installing wall drainage is quite simple if you have a work plan and a plan on hand. Let's consider an easier option - a linear system, since it is recommended to equip the reservoir system only by specialists.
 Photo - arrangement
 How to do wall trench drainage with your own hands:
- At the calculated level, a trench is dug from the house according to a certain size. Please note that it should exceed the size of the pipe by several centimeters (if tubular drainage is being arranged);
 Photo - calculation
 - From the foundation slab or pillars you need to retreat 10–20 centimeters;
- When arranging a drainage system on sand additional organization sand cushion is not required. But if you are working on rocky, clay and other soils, then the bottom of the pit will need to be covered by 20 centimeters with fine river sand;
- The system is then waterproofed. To prevent water from flowing beyond the designated route, moisture-resistant fiber is covered throughout the system. At the same stage, drainage insulation is provided. A variety of materials can be used for this: Maxdrain 8GT geotextile, fiberglass, improvised means;
 Photo - heat and waterproofing
 - Crushed stone or fine gravel is poured over the heat and water insulation film. The lower to the bottom, the smaller the fraction. Backfilling is necessarily carried out at a certain level along the entire length of the drainage;
- For laying, special drainage pipes are used, which have small perforations along their length. Holes should not be larger than rubble, otherwise the system will clog. They are installed according to the level that the drawing indicates;
- The nodes are connected to each other with clamps. Most often, non-pressure drainage systems do not require “dead” fastening using thermal tools;
 Photo - the principle of connecting pipes
 - After the entire structure of the pipes is additionally rewound with insulation to prevent them from freezing in the winter;
- It remains only to backfill the surface layer and connect the drains to the septic tank.
 Photo - supply to the septic tank
It is possible to fix a septic tank only in places with the lowest level, otherwise their installation will be impractical. The total estimate can be significantly lower if you use driftwood, boards, bricks or plastic bottles instead of pipes. In terms of time, the entire organization takes from several days to a week of intensive work.
 Photo - design
 Price overview
If there is no desire or opportunity to work on wall drainage yourself, then you can contact the construction companies in your city, the price depends on the complexity of the work and the size of the system. Consider approximate cost for 1 running meter of turnkey drainage.
One of the ways to protect the foundation of a building is wall drainage. Its device is able to provide effective water drainage from the structure, which is the key to long-term trouble-free operation of the entire building. Very often, especially in places with a high groundwater level, it is difficult to prevent water from entering basements with insulation methods alone.
This problem can be solved with the complex application of several methods of protecting structures from moisture.
Such a complex must necessarily include the following activities:
- foundation waterproofing, using highly efficient modern materials,
- arrangement of groundwater drainage systems, which will significantly reduce their inflow, and in the optimal case, eliminate it altogether.
So, you have already decided that the reason for the appearance of water in the basement, the presence of constant dampness is the high level of groundwater. Then the device of an effective drainage system is an urgent need.
The operating principle of such a system is based on the following.
At a depth somewhat greater than the depth of the foundation, a hydraulic stop is performed (this should be done even in the process construction works). To do this, it is necessary to carry out layer-by-layer filling with clay, with its obligatory ramming. At the same time, crushed stone must be added to several layers of clay. In this way, the inflow of water from the lower horizons will be significantly reduced.
|
|

After that, a drainage system is mounted around the house, around the entire perimeter. In this case, all pipes must be looped, in compliance with the required slopes. (drainage wells are allowed at the corners of the building).
As a drainage element, plastic perforated pipes and several layers of crushed stone filling are used.
To prevent erosion, the entire structure is wrapped with a special membrane material - geotextile.
Water can be drained from the drainage system either into special wells or into the sewerage system.
Stages of installation of the drainage system
Technologically, like any construction process, wall drainage can be divided into several stages. We will consider the issue of installing drainage with an already built house. That is, after the first flood, you find that the groundwater is too close to the surface, and this leads to flooding of the basement. What should be done in such a case?
First of all, it is necessary to determine the extent of the problem. Based on this, a method for lowering the groundwater level can be chosen.
Technically, there are many options, but some of them are applicable only in specific conditions, and their cost is different. Therefore, in each case, only a specialist with experience in performing such work can make the right choice.
It is very problematic to independently take into account all the factors affecting the flow of water into the room.
Depending on where the water is supposed to be discharged, the foundation drainage scheme will depend:
- it is possible to arrange annular drainage, with drainage into one drainage well or sewerage system,
- you can use schemes with a different number of wells at the corners of the building.

The direction of the slope of the drainage pipes will depend on this choice.
It is worth noting that with a ring scheme, the length of the drainage line will be equal to the perimeter of the building, so a significant slope will be required. The slope must be at least 1% (1 cm per 1 m).
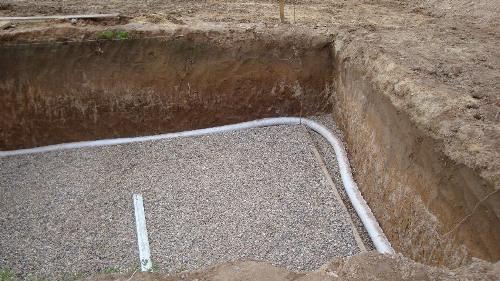
We carry out earthworks. A trench is dug along the foundation to a depth that will exceed the foundation level.
Please note that you should not expose all sides of the house at once. It is best to work sequentially on each wall.
At the bottom of the trench we arrange a hydraulic lock (hydraulic stop). How to make it has already been mentioned above - clay in layers along with rubble, each layer is subject to careful tamping.
Consider the future slope of the drainage line. For its precise formation at the bottom of the ditch, we arrange a bed of sand or fine gravel.

In order to protect the wall drainage of the foundation from rapid silting, it is necessary to use geotextiles. This modern material will only allow water to pass through, protecting the drainage layer from mechanical stress. The geotextile is laid on the bed in such a way that it can cover the entire drainage layer.
After that, pipes for drainage are laid. Special perforated pipes are on sale, and plastic sewer pipes with a diameter of at least 160 mm are also used in private housing construction.
The pipes are joined together or brought to the appropriate drainage wells. A layer of crushed stone is poured over the pipes, which will form a drainage layer. This whole structure is carefully wrapped with geotextile, which is desirable to be tied with a rotting towline, such as nylon.
Backfilling is carried out with large river sand, which will be an excellent filter for groundwater.
That's all the main steps included in the foundation drainage device.
Works at the device of effective drainage
As already mentioned, it is the complex solution of the issue that will bring the greatest effect, so a number of more works should be done.
When you expose the foundation with a trench, it is necessary to check the condition of the waterproofing, if necessary, restore and strengthen it.
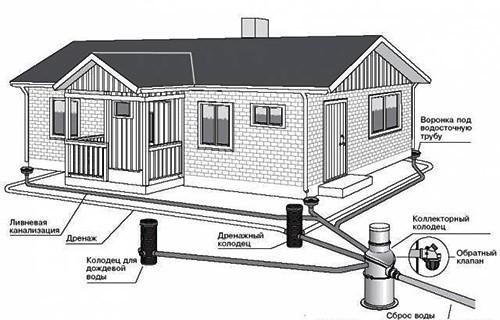
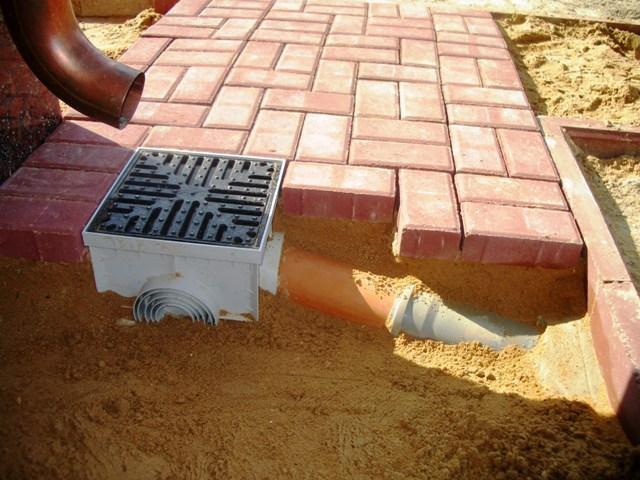
 In addition to groundwater, a big problem is water coming from roof gutters. We recommend, together with the laying of drainage pipes, to mount a storm sewer and drain precipitation through special water intake funnels in the blind area.
For effective drainage, it is desirable to reduce the level of soil freezing under the blind area. To do this, it is advisable to provide an insulating layer, for example, from extruded foam.
In this case, the drainage device around the house will be most effective.
Drainage wells, into which both groundwater and atmospheric water will drain, are easiest to make from concrete. When installing, do not forget about the reinforcement of the walls of the well and about high-quality waterproofing. The collected effluent is either pumped out or redirected to sewer systems.
In this way, in most cases, it is possible to solve the problem of a high level of groundwater, but once again, the conditions are different, so it is best to contact a specialist to develop an effective system. But the installation is quite possible to do it yourself.
In order to prevent flooding of the house on the site, wall drainage should be equipped. Such a system will limit the rise in groundwater levels to a critical level, when there is a possibility of flooding the first floor and flooding the basement, which can cause the destruction of the foundation.
The described system is a whole complex of elements that are below the level of the basement floor and protect the structure from storm water and the penetration of underground moisture. You can carry out these works on your own, they will not be too costly financially, but you will have to work hard. After all, you have to dig a pit around the perimeter of the house, and then fill it with the components of the system.
Peculiarities
The same slope must be observed along the entire length of the ditch. Perforated PVC pipes are laid on the gravel. The pipes must have holes that do not exceed the minimum size of the gravel particles, otherwise clogging will occur.
The wall drainage project must necessarily provide for the need to connect pipes to each other. The whole system is equipped with a general slope, which is 2 cm per 1 m of pipe length. You can check the correct location of the elements using a stretched cord. It is important to provide for a vertical pipe, which will have a closable lid. This node is provided when turning. Such elements will facilitate the flushing of the system.

The laid pipes are wrapped with geotextile, there should be no gaps between the turns, this will eliminate the possibility of gravel getting into the holes. Fixation can be done with a nylon rope. The wall drainage scheme provides for backfilling the pipes with 20 cm of clean gravel. The gravel cushion is covered with overlapping geotextiles to prevent soil from entering the cracks.
Coarse river sand is poured over the drainage, which will act as an additional filter. Particular attention should be paid to the tight fastening of the textile winding at the ends of the branches. The outlet of the sewer pipe, which will depart from the house, should be insulated. It is covered with a layer of foam by 25 cm.
General requirements and norms

Wall drainage at home should be equipped in accordance with the rules and regulations. The system should be located outside, along the contour of the building. The step between the wall and the drainage pipe is determined by the design width of the foundation and the placement of manholes. If the base of the house is located at an impressive depth, then drainage can be laid above the sole of the foundation, however, these recommendations are correct only if measures are taken to prevent the drainage system from sinking.
If you want to save on sand and reduce the cost of construction, you should use geocomposite materials, which consist of profiled plastic membranes glued with geotextile on one side. The membranes will be able to protect the base of the house from moisture and will cope with the drainage of water to perforated pipes, because they have a unique surface. The geotextile filter will allow water to pass through, but retain soil particles.
Selection of drainage pipes
The wall drainage device provides for the need to select pipes. The material must be selected taking into account the depth of installation and the aggressiveness of groundwater. The most popular plastic pipes are:
- polyvinyl chloride;
- high density polyethylene;
- low pressure polyethylene;
- polypropylene.
Plastic drains are widely used, because they are light, easy to deliver to the site and easy to lay. Drains can be selected with full or partial perforation. They are intended for a specific laying depth, but usually this value does not exceed 6 m.
Features of laying drains
The pipes can be connected to each other by couplings, which are made of material identical to the pipes. During installation, it is important to ensure that the water inlets are on the sides. The bottom and top sides of the pipes must be solid, without cuts.
In order to prevent clogging of the holes, the pipes must be wrapped with geotextiles. In addition, this measure will protect the material from silting. It is not necessary to increase the longitudinal slope of the pipes more than the minimum standards, as this will increase the volume of construction work. The maximum slope was mentioned above, and it is determined taking into account the permissible value of the water flow rate. This parameter is equal to 1 m per second.
Manhole installation
It is important to provide a gap between manholes, which is 40 m in straight sections. Neighboring drainage wells should be 50 m apart from each other. It is important to ensure a distance of 20 m from the turn of the drain. Additional wells are installed after one turn if the system has several turns in a complex area between two wells.
If you are arranging drainage yourself, then be sure to remember the depth of the drainage and water intake elements. If it is not possible to organize the release of water by gravity from the drainage, then it is important to provide for the presence of a pumping station.
Conclusion
Wall drainage is one of the effective ways to protect the foundation of a building from the effects of water. Its device is the key to long-term operation of the building. It is possible to solve the problem of water ingress into basements in a complex way, using several methods of protection at once.
If you decide to equip a hydraulic seal, then the clay is laid with a mandatory rammer. Several layers should be supplemented with crushed stone. This method will reduce the inflow of water from the lower horizons. After that, you can start laying the drainage system around the perimeter of the building. Pipes should be looped, ensuring the presence of drainage wells in the corners.
To drain water from a personal plot, underground and surface drainage channels are laid, located at different distances from the house. The complexity of drainage work is affected by the height of groundwater, the terrain, as well as the degree of slope of the site. Protection of basements, technical undergrounds and other buried parts of the house from flooding caused by groundwater, precipitation, surface runoff is provided by wall drainage of the foundation. Drains laid in trenches along the perimeter of the building are able to divert water from the object, thereby preventing the appearance of dampness, mold and premature destruction of structures.
This video shows the technology of wall drainage device step by step:
When should a wall drain be built?
Depending on the characteristics of the land plot, a decision is made on the need for work on the installation of wall drainage. However, in some cases, these works are performed without fail:
- when the buried parts of the house are located below the estimated level of groundwater occurrence;
- when installing basement floors at a height not exceeding half a meter above the estimated level of groundwater occurrence;
- when arranging exploited underground facilities on clay and loamy soils, while the presence of groundwater does not play a role;
- placement of structures in the area of action of capillary moisture and the inadmissibility of the appearance of dampness in the premises;
- the device of subfields for technical purposes in clay and loamy soils, if the project provides for their deepening by more than 1.3 m, counting from the surface of the earth.
In order to exclude flooding of the soils of the territory and limit the flow of water to residential buildings and outbuildings, not only the drainage of the foundation is carried out, but also a blind area with a slope of 2% and a width of at least one meter along the entire perimeter of the object is necessarily erected.
It helps to solve this problem by high-quality soil compaction, which is carried out when backfilling trenches and pits in accordance with current standards. A protective layer of waterproofing is applied to the parts of the building in contact with the ground, in any case, regardless of the presence or absence of foundation drainage. When building a house on sandy soils, which easily pass water into the lower layers of the soil, and do not freeze deeper than 80 cm in winter, wall drainage is not equipped.
Scheme of a wall drainage device that protects the buried structures of the house from flooding with groundwater
General norms and requirements
Installation of the wall drain is carried out from the outside of the building along its contour. The distance between the drainage pipe and the wall of the building depends on the design width of the foundation, as well as on the placement of manholes. The depth of laying the wall drainage should not be lower than the base of the foundation slab or sole strip foundation. If the foundation structures are at a considerable depth, then it is allowed to lay drainage above the base of the foundation, if measures are taken to prevent subsidence of the elements of the drainage system.
To save on sand and thereby reduce the cost of construction, it is recommended to use geocomposite materials consisting of plastic profiled membranes pasted over on one side with geotextiles. Drainage membranes not only protect the foundation from moisture, but also well drain water to perforated pipes due to their unique surface. At the same time, the geotextile filter freely passes water, retaining particles of the drained soil.

The use of a two-layer profiled membrane allows you to save on the thickness of the layer of filtering bulk materials
Selection of drainage pipes and their laying in trenches
The material of drains (perforated pipes) is chosen based on the depth of their installation, as well as taking into account the aggressiveness of groundwater. At the moment, drainage plastic pipes made of the following materials are especially popular:
- PVC - polyvinyl chloride;
- HDPE - low pressure polyethylene;
- NDPE - high density polyethylene;
- PP - polypropylene.
The most widely used plastic drains due to the ease of their delivery to the site and ease of installation, as well as the availability of all the necessary factory-made components.
So, drains can have full or partial perforation, and also be designed for a specific laying depth, usually not exceeding 6 meters. The pipes are connected to each other by couplings made of identical material. When laying drainage pipes, workers should ensure that the water inlets are located on the sides of the drain. The top and bottom sides of the pipes must be solid without cuts. To prevent clogging of the holes, the pipes are wrapped with geotextiles. The same material protects against premature silting and a layer of rubble in which drainage pipes are laid.
When arranging drainage around the foundation, they maintain the required slope of the drainage pipes, which ensures a full flow of water, during which the drains do not silt and the soil does not erode. This also takes into account the water content of the drained horizon.

It is important to note that it is not advisable to increase the longitudinal slope of the drains above the minimum standards, as this contributes to an increase in the volume of construction work. The maximum slope of the drainage is determined based on the maximum allowable value of the velocity of water flow through the pipes, equal to one meter per second.
The purpose of manholes and their installation
The installation of manholes is necessary for the revision of the state of the drainage system and the timely cleaning of its elements. If necessary, additional differential and receiving tanks are installed. They usually have:
- in places of turns of the route;
- in areas of significant change in drain slopes;
- with a large length of the laid drainage pipe.
In doing so, the following rules are adhered to:
- 40 meters - the maximum gap between manholes in straight sections of drainage systems;
- 50 meters - the maximum distance between adjacent drainage wells from each other;
- 20 meters should be from the turn of the drain, made due to the existing ledge of the building, to the nearest inspection well (at the same time, a well is not installed at the very turn for inspection and cleaning of the system).
If in a complex area enclosed between two manholes, the drainage system has several turns, then it is necessary to install additional wells through one turn.

The installation of manholes is carried out at the points of rotation of the pipeline system
If you arrange drainage on your own, remember the depth of the water intake and discharge elements of the drainage system, which should not be less than the value indicating the level of soil freezing in the area. The discharge of water from drainage pipes by gravity can be directed to the rainwater sewer, to flowing reservoirs or to drains. If it is not possible to organize a gravity discharge of water from the drainage, then they provide for the installation of a pumping station responsible for pumping drainage water.
So you learned how to make the drainage of the foundation of the house. Now, taking into account the forthcoming amount of work, it is possible to make a decision on their independent implementation or on the use of the resource of specialized companies.
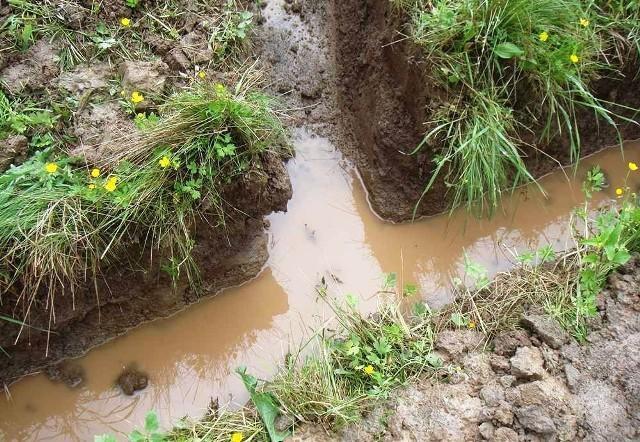
An excessive amount of water adversely affects the quality and durability of foundation support structures, leads to flooding of basements and creates significant inconvenience in the process of carrying out various landscape activities. In view of this, the construction of a drainage system is an obligatory stage in the arrangement of any site.
The main function of drainage is to ensure the protection of the supporting structure of the building from the harmful effects created by groundwater. The drainage system reduces the likelihood of basement flooding, reduces the risk of swamping and flooding of the territory.
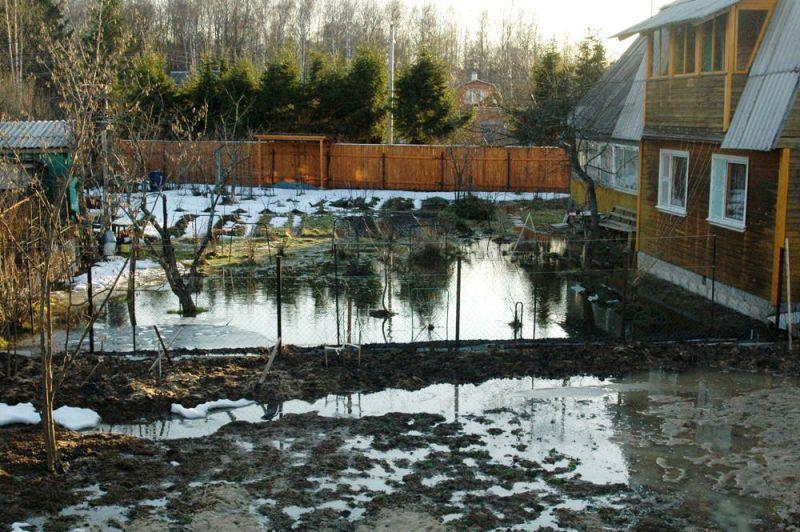
By neglecting the drainage device, the owner runs the risk of significantly increasing the likelihood of reducing the service life of the supporting structure due to waterlogging and exposure to frost heaving forces.

Water in the basement - a consequence of design and construction errors, the lack of a drainage system
Many developers are interested in: is it necessary to equip drainage if the groundwater is low enough, and the soil on the site is not subject to frost heaving to a high degree? The answer is: each case is subject to individual consideration. The unconditional need to create drainage occurs in the following situations:
- if the basements are buried below the groundwater level or if the floor of the basement rises above the groundwater level by less than half a meter;
- if the basement is equipped in clay or loamy soil. The level of passage of groundwater in this case does not matter;
- if the technical undergrounds in the area with clay / loamy soil are buried more than 150 cm in relation to the horizon. Features of the passage of groundwater in this case are not taken into account;
- if the building is located in the zone of capillary moisture.
The conclusion from the above is the following:
- a drainage system is needed if groundwater is critically close to the supporting structure of the building, or if it runs so high that the site area looks swampy and almost nothing grows on it;
- a drainage system is not needed if the site is dry and the groundwater level during the rainy season and the flood period does not rise to a critical level.
Optimal drainage system
There are several types of drainage systems. In combination with the foundation structure, it is advisable to use 2 of them.
First, ring drainage.

This system is designed to protect basements from flooding with groundwater. At the base are tubular drains laid along the contour of the supporting structure.

The principle of operation of ring drainage is based on a decrease in the level of groundwater in the protected circuit, thereby reducing the risk of flooding of underground structures. The depth of the pipes in relation to groundwater directly depends on how much the level of the latter will decrease. Laying of ring drains is carried out at a certain distance from the building (usually 1.5 - 3 m from the foundation), which makes it possible to arrange drainage after the construction of the building.

Secondly, reservoir drainage. The disadvantage of such a system over the above option is the possibility of arranging it exclusively at the stage of building construction, because. it is equipped under the sole of the foundation at the level of sand backfill. Excess moisture through perforated drains (pipes) enters the receiving well, from there to the place chosen by the developer (sewerage, reservoir, any depression in the relief of the site, or it is pumped out and used for household needs, for example, for watering plantings).
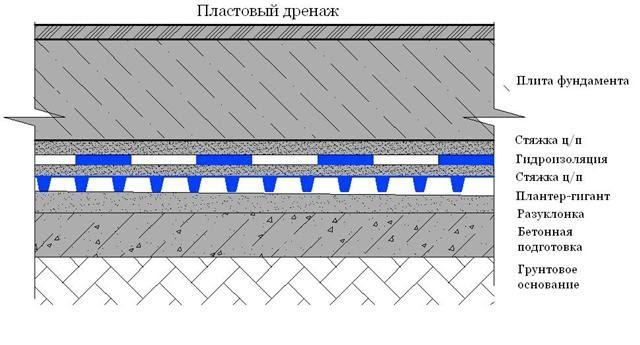
When arranging reservoir drainage, simultaneous protection of the foundation structure from groundwater and capillary moisture is ensured. Reservoir drainage is especially effective in the construction of buildings with basements on poorly permeable soils. Such drainage is also appropriate if the site is located in an area with a powerful aquifer. Reservoir drainage must be equipped if the building is located in the zone of capillary soil moisture and has a basement.

Reservoir drainage - innovations
To make the drainage of your home as efficient as possible, we will tell you about the arrangement of both the ring and reservoir systems. If the building has already been erected, it will remain to be content with ring drainage alone - no one will destroy the building for the sake of stratal drainage.
Prices for drainage pipes
drainage pipes
What is the drainage?

The main elements of the drainage system are pipes, inspection wells and a well for collecting water. The installation of the latter is carried out if the building is located on a flat area in the absence of the possibility of diverting water outside the site.

Pipes for drainage
Previously, for the arrangement of the drainage system, mainly metal, asbestos-cement and ceramic pipes were used.

Such products were used solely because of their wide availability and had a number of disadvantages, including:
- frequent clogging and silting;
- relatively short service life;
- the need for self-preparation of holes for water inflow.
A much more efficient, convenient and modern solution is plastic pipes - we recommend using them when arranging the drainage system.


The drainage system is best assembled from perforated pipes with stiffeners to ensure even distribution of loads on the products.
The advantages of plastic pipes are obvious:
- long service life;
- high strength properties. The presence of stiffeners, as noted, contributes to a uniform distribution of loads, which allows the pipes to effectively withstand the resulting pressure;
- resistance to decay, corrosion and various adverse effects;
- ease of transportation and installation. Plastic pipes for arranging drainage weigh little and bend well, which allows them to be mounted without the use of additional compensating elements;
- the ability to self-cleanse. The inner walls of the pipes under consideration, unlike the outer ones, are smooth, which eliminates the possibility of accumulation of contaminants;
- optimal ratio of cost and quality indicators.

Plastic pipes are the best value for money
Plastic pipes can be laid at a depth of up to 5-6 m, i.e. with their help it will be possible to equip the drainage of any foundation.
Helpful advice! Perforated plastic pipes with pre-installed filters are available for sale. When choosing those, it is necessary, first of all, to focus on the characteristics of the soil on the site. Recommendations are given in the table.
Table. The choice of filters depending on the type of soil
| Soil type | Filtration Recommendations |
|---|---|
| Perforated plastic pipes are suitable for arranging drainage in such soils without the use of additional filters. | |
| In this case, filtration is provided by the forces of geotextiles and crushed stone backfill. | |
| In this case, it is allowed to arrange drainage without using additional filter material, but after laying the pipes, a minimum of 20 cm crushed stone backfill is required. | |
| In order to prevent silting of pipes, filtration from geotextiles is equipped. |
When choosing the diameter of drainage pipes, they are guided, first of all, by the degree of soil moisture. According to the technology, an extensive hydrological calculation must be performed, but in practice, in the conditions of private land, everything is usually limited to standard values, namely:
- for top water - 10-centimeter pipes;
- for ring and reservoir drainage - 16.5 cm pipes.
The depth of laying pipes is determined in accordance with the level of soil freezing - drainage should be below this point.

When arranging the drainage system, 2 types of wells are used.
First, inspection (revision) wells. They are installed to monitor the state of the system and clean it from blockages. When these are formed, the pump is lowered into the well and the pipe is cleaned. Installation of inspection wells is carried out at the intersection of pipes, at every 2nd turn and with a 50-meter step on straight pipelines. The standard diameter of such products is 60 cm. In addition, manholes take on the function of sand traps. To do this, the lower part of the structure is equipped with a special catching grid, and the installation of the product is carried out so that its bottom is 10-30 cm lower than the pipes (the specific value is selected in accordance with the height of the outlet fittings for connecting pipes).

Secondly, a well-collector. It is the final reservoir of the system - it is here that the collected moisture flows. The tight design is completed with a deaf bottom. The collected water can be used for irrigation or diverted to a reservoir, ravine or other suitable place.

If land plot located on sandy soil or other soil with good water permeability, instead of a collector well, you can install a so-called. filter well. There is no blind bottom for such a container. Instead, a layer of permeable material, usually gravel, is backfilled. The water that enters the filter well through the pipes of the drainage system is discharged into the ground.

Additionally, the system includes plugs, adapters, fittings and elbows. The connection is made through the sealing gaskets from the kit. The range of available accessories is shown in the photo.

Prices for drainage wells
drainage well
preliminary calculations
When arranging a private drainage system on its own, the calculations come down to determining the depth of pipes and wells, as well as the optimal slopes of pipelines.
The depth of laying the drainage is determined by the depth of the foundation. The principle is simple: drainage is arranged 0.3-0.5 m below the foundation sole.

The slope of the pipelines must be such that the water moving through them can be discharged quickly and efficiently into the receiving tank. Traditionally, a slope of 20 mm per linear meter is maintained.
Pre-find the highest and lowest points of the site. In the first one, you will arrange a place for collecting water (most often this is the highest corner of the house), in the second, you will mount a receiving well. Due to the natural slope, you do not have to buy additional pumping equipment for pumping groundwater.
For a better understanding of the situation, check out the example of calculating the drainage of the foundation.

An example of a specification for a rectangular bath 6x6 m, drainage wells - 3 pcs.
- building dimensions - 9x6 m;
- the distance between the collector well and the building is 10 m;
- the value of the protrusion of the upper edge of the well above the ground is 0.3 m.
To determine the length of each individual section of the trench to the water intake, add the lengths of the sides of the building. In this example, the result will be 15 m. The total distance to the receiving well in this case will be 25 cm. The total slope of the system under consideration is 0.5 m (a couple of centimeters for each of the 25 m obtained).

Important! The distance between the foundation and the elements of the drainage system should be at least 3 m. Sand and gravel are backfilled at a depth below the freezing level of the soil.
Do-it-yourself reservoir drainage
The main function of such a system, as noted, is to protect the foundation from the harmful effects of groundwater and basements from flooding. Reservoir drainage can be used as an independent tool, or as a part of complex drainage. In the second case, pipelines are used to connect reservoir drainage with external drains.
The minimum thickness of the formation drainage layer, equipped under the foundation, taking into account backfilling, is 30 cm. The dimensions are selected so that the perimeter of the drainage system extends 20-30 cm beyond the perimeter of the building.


Important note! In practice, a special need for the use of reservoir drainage arises only during construction on clay soil. In other cases, the ring drainage system, as a rule, is more than enough.
Determine the depth of the pipes so that they are located below the clay ball of the soil.
Important note! Information on preliminary marking, excavation and subsequent arrangement of the foundation after the laying of drainage pipes is not given, because about all this earlier in detail in the corresponding publication of our site.
Work on arrangement of reservoir drainage system is as follows.
- Having prepared the foundation pit for the supporting structure, you further deepen it by at least 20 cm. At this stage, as noted, you need to remove a wider layer of soil compared to the place where the foundation passes.
- Next, the bottom of the resulting pit is covered with a 20-cm layer of gravel. The backfill is carefully compacted and leveled with observance of the slope (in this case, it is advisable to make a 3-centimeter slope for each meter of the site) in the direction of the receiving well.
- Further along the perimeter of the crushed stone base, flexible perforated plastic pipes with stiffeners are laid. The ends of the pipes are diverted to the location of the receiving well.
Further arrangement of the foundation is carried out in the standard manner.
As a result, moisture penetrating under the foundation sole will penetrate through the perforated holes into the pipes and be discharged through them into the receiving well.
As for the receiving well, in the case of reservoir drainage, it is advisable to use its filtration variety. The dimensions of finished round filtration wells are on average 150 cm, rectangular - 280x200 cm. Height - more than 200 cm.

For a well, preferably at a distance of at least 3 m from the future foundation, a hole is dug so deep that the bottom of the receiving tank is located at least 1 m below the entry point of the drainage pipe. This is ideal. In practice, they make sure that at least 1 m of difference remains between the groundwater and the bottom of the well. Compliance with these rules will ensure the most efficient and proper operation of the drainage system.
The length and width of the pit is selected so that after installing the well, at least 200-300 mm of free space remains on each side of it. The well is installed in the pit. The bottom of the tank is covered with a 30-cm layer of gravel, compacted.

The space between the tank and the walls of the pit is also filled with rubble to a minimum height of 1 m. The pipes of the drainage system are introduced into the tank. From above, all this is covered with geotextiles and covered in layers with sand and soil with careful tamping.

Water from the well will be discharged into the deep layers of the soil.
Helpful advice! Do not fill the well completely - leave the possibility of revision work. To do this, having brought the backfill to the upper edge of the well, install the sealant, neck and hatch from the kit.
Important! To install the well, you will have to involve special equipment and / or several assistants - it is unlikely that you will be able to cope with a two-meter volumetric structure on your own.


Do-it-yourself ring drainage
Such a system can be equipped after the completion of the construction of the building. The recommendations for spacing between structures and drainage remain the same.
A couple of additional important remarks should be made first.
Firstly, regarding the depth of the drainage pipes. The dependence is simple: the pipes are laid half a meter below the foundation of the building.

Secondly, regarding the storage well. In the case of a collector system, it is more expedient to use its variety with a blank bottom. The installation procedure differs from the instructions for the filtration well only in the absence of crushed stone bottom backfill.
Revision wells are installed according to the same principle as storage wells. Only the overall characteristics of the products change (selected depending on the conditions of a particular situation) and the place where the drainage pipes enter.


Thirdly, regarding the size of the trench. To determine the optimal indicator, add 200-300 mm to the outer diameter of the pipe. The remaining free space will be filled with gravel. The cross section of the trench can be rectangular and trapezoidal - as you prefer. From the bottom of the pits, stones, bricks and other elements that can violate the integrity of the pipes being laid must be removed.
The order of work is presented in the table.
For your own convenience, you can make a markup first. To do this, step back from the walls of the house 3 m (ideally. In the absence of sufficient space, many developers reduce this figure to 1 m, be guided by the situation), drive a metal or wooden peg into the ground, step back further from it to the width of the trench, drive in the second peg, then set similar landmarks opposite, at the opposite corner of the building. Stretch the rope between the pegs.
Table. Do-it-yourself ring drainage
| Stage of work | Description |
|---|---|
| Dig trenches around the perimeter of the foundation. Do not forget about the slope of the bottom - keep it within 1-3 cm per meter. As a result, the highest point of the drainage system should be located below the lowest point of the supporting structure. |
|
| Fill the bottom of the trench with a 10 cm layer of river sand. Tamp carefully with observance of the given slope. Lay a layer of geotextile on top of the sand (if the soil is clean sandy) of such a width that in the future it will be possible to cover the pipes, taking into account the thickness of the crushed stone backfill. On top of the geotextile, pour a 10-centimeter layer of gravel, not forgetting to withstand the specified slope. Lay pipes on rubble. The image shows ordinary orange sewer pipes - here the developer made the holes himself. It is more convenient to use the initially perforated flexible pipes recommended by us, but if there are none, you can go the way of the developer from the photo. Maintain a 5-6 cm step between the holes. Recommendations for connecting pipes were given earlier. |
|
| Pour a 15-20 cm layer of gravel over the pipe. Overlap the geotextile. As a result, the pipes will be surrounded on all sides by gravel, separated from the soil and sand by geotextiles. |
In conclusion, it remains to install revision and storage wells, connect pipes to them and backfill the soil.

Typical mistakes in foundation drainage
Check out the list of the most popular mistakes made by private developers, avoid them in the process of doing the work, and the drainage of your foundation will last as long as possible without any complaints.
- First, do not pin your hopes on the wall foundation. Its functions are reduced mainly to the removal of precipitation, and not groundwater.
- Secondly, do not use geotextiles as a filter if your site is located on loam or sandy loam - after a few years, the filter will become clogged, which will degrade the efficiency of the drainage system.
- Thirdly, controlling the angle of inclination of trenches for laying pipes, if possible, work with a theodolite and a level instead of a level - it’s more correct.
- Fourth, use drainage wells instead of storm wells. The latter are designed to collect atmospheric precipitation.
- Fifth, do not put all your hopes on the drainage system alone. To ensure the most efficient removal of moisture from the supporting structure and structure, a drainage system must be equipped in the direction of the storm drain.
This point deserves separate consideration. First of all, remember: drainage and stormwater must not be connected to the same pipe. In practice, with such a solution, the effect will be the opposite of what is expected - in the rainy period, the drainage will not cope with the removal of moisture. As a result, the soil near the supporting structure will become waterlogged, in winter the excess moisture will freeze, and the soil will swell. This can lead to deformation of the blind area, the occurrence of movements of the supporting structure and its further destruction.

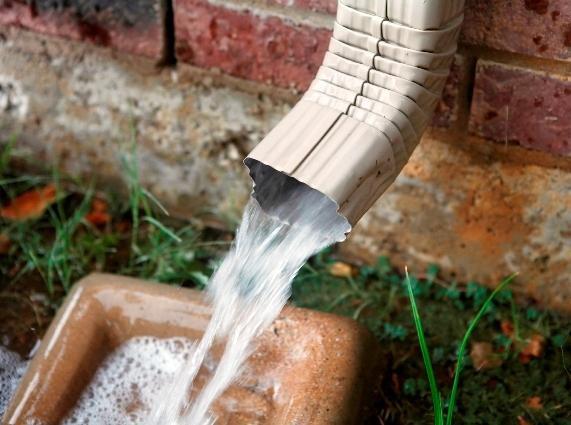
For the manufacture of stormwater, you can use ordinary orange sewer pipes. The system includes water intake trays. Water is drained into a storage well. detailed instructions on the arrangement of storm water is not given, because this is a topic for a separate voluminous publication not related to the drainage system.
Rainwater prices
storm drain
Video - Do-it-yourself foundation drainage