Everyone knows the popular expression that says that acquaintance with the theater begins with a hanger. We will not be mistaken if we say about the dacha that it begins with a toilet. By its appearance and device, one can judge the owner. The “handy” owner has this building beautiful and neat. It has no drafts and no bad smell.
It will be useful for beginners of country life to learn how to build an inexpensive and comfortable outdoor toilet with their own hands.
In this article, we will talk about the most common types of closet structures, their arrangement and consider the possibility of combining with other summer cottages.
According to the method of disposal of sewage, these facilities are divided into three types:
- Powder closets;
- Toilets with a cesspool (septic tank);
- Water closets.
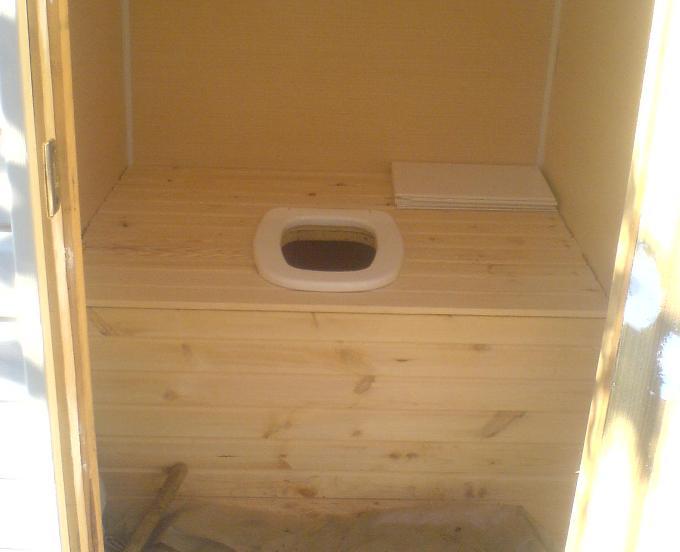
The first type of outdoor toilet is easy to arrange and operate. Its main part is a seat (stool), under which a removable container is installed. After each visit, a peat mixture is poured into it with a scoop, which absorbs liquid and unpleasant odors.

A toilet seat with a sealed lid and a bucket of peat - that's all you need to equip an outdoor latrine
A significant drawback of this design is the small capacity of the bucket. For those who rarely visit the dacha, powder closet is optimal. If you plan to spend weekends on your site or your family has more than three people, you will often have to empty the container.
An improved version of powder closet is a peat dry closet, offered on the market today. It consists of a plastic case, inside which one or two containers are placed. A tank with a peat mixture and a dispenser is installed on top.

1, 2 – containers for the solid fraction; 3 - funnel for liquid; 4 – funnel for solid fraction; 5 - a tank with a dispenser for peat; 6 - ventilation pipe; 7 - drainage tube
To eliminate unpleasant odors, the structure is equipped with an exhaust pipe leading to the roof of the cabin. Empty containers in such a toilet should be no more than once a week. This is achieved by separating the liquid and solid waste fractions.
When using a dry closet, the liquid enters a funnel located in the front of the body and is discharged through a tube into the ground or a plastic container located on the street. Dense fractions of sewage accumulate in the inner container.
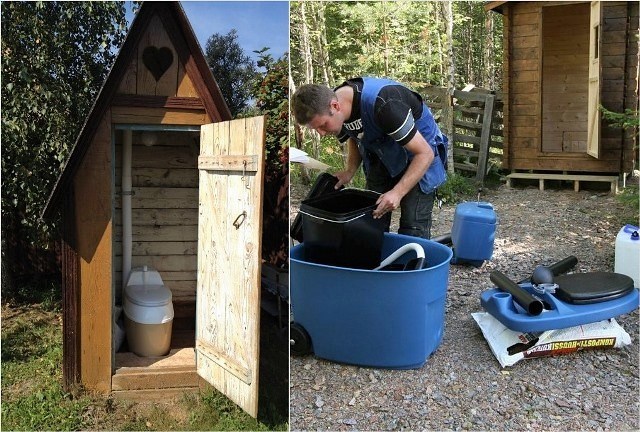
Dry closet in the "combat position" and in the process of installation. In the first case, the closeness of the booth catches your eye, so we do not advise you to save on its area at the expense of comfort.
Despite the advantages of a peat toilet over a classic powder closet (conversion of waste into fertilizer, good ventilation and extended use), many summer residents choose the option with a cesspool (septic tank). Its device is cheaper than buying an "advanced" dry closet, and the frequency of cleaning is 1-2 times a year.
At the same time, one should remember two serious problems that the cesspool can present to its owners if it is built incorrectly:
- Infection of the soil with pathogenic bacteria;
- Bad smell.
It is not enough to simply dig a large hole in the ground and put a closet over it. The sewage tank must be securely isolated from the ground. A concrete tank treated with a waterproofing impregnation is best suited for this purpose.
The second condition is the introduction of special bacteria into the cesspool. They quickly decompose sewage, disinfect them and eliminate odor. Dry concentrates of bacteria for septic tanks and cesspools can now be bought at any household supermarket.
The design of the backlash closet (air toilet) cannot be called too complicated. Its main part is a concrete pit with a hole. A booth is installed on it. To eliminate unpleasant odors, an exhaust pipe is placed on its back wall. Its lower end is in the pit, and the upper one rises above the roof. Due to the difference in height, thrust is formed. The air from the cabin is sucked into the pit and expelled into the atmosphere through a pipe.

Scheme of the design of the backlash closet
Another popular option for a summer cottage toilet is a water closet. Its main part is the well-known toilet bowl with a flush tank. There is a water lock in it, which excludes the possibility of the smell coming out of the pit into the booth. Unfortunately, it is impossible to use such a system without heating, because in winter the water in the toilet and cistern freezes. Therefore, this design is designed for the warm season.

Drawing of a street water closet
With the onset of warm days, the container on the roof of the booth is filled with water. The outlet channel is connected to through a tee equipped with a vertical ventilation pipe.
Toilet cubicle options
You can build a toilet cubicle from different materials. Most often, the basis of the structure is a wooden frame sheathed with OSB, grooved board, plywood or siding.

The toilet, sheathed with a planed board, looks neat and cozy
Moving away from the use of the frame and sheathing, the house can be folded from, thereby creating a picturesque imitation of a log house.

Lovers of natural wood can also be advised to use a blockhouse for sheathing. It is cheaper than a massive log and is easily mounted on a frame. No less attractive are the walls of the toilet, lined with wooden clapboard "herringbone".

Many dacha owners are not satisfied with the rustic look of the "birdhouse" toilet. Striving for originality, they erect luxurious log mansions on the plots for "solitary reflections."

Brick and blocks as materials for the construction of latrines are still very popular. Whatever one may say, but the capital structure will stand for more than a dozen years. Neither dampness, nor wind, nor the sun will harm him.

If not at hand facing brick, then the walls can be built from the remains of red and silicate. High-quality plaster will hide the irregularities of the masonry.

A booth built from mixed bricks is waiting for a plaster finish
Translucent polycarbonate can be used for lining a metal profile booth. This material looks very aesthetically pleasing and is not afraid of moisture.

Sheet corrugated board is a practical and durable material for a toilet cubicle. You can put it on both wooden and steel frames. The only condition is the internal lining of the walls with insulation. Without this addition, there will be a hot “oven” in the summer, and a freezer in the winter.

Interior decoration of the booth with plastic clapboard - concise and hygienic
Straw blocks can be attributed to the category of unusual materials used for the construction of latrines. The cabin built from them is warm and cozy. Anyone who wants to impress the imagination of neighbors and guests does not go to the construction base for materials. Having collected a certain number of empty bottles, he builds a toilet out of them "to everyone's surprise."

In addition to rectangular and rounded structures, "huts" of various sizes are very popular.
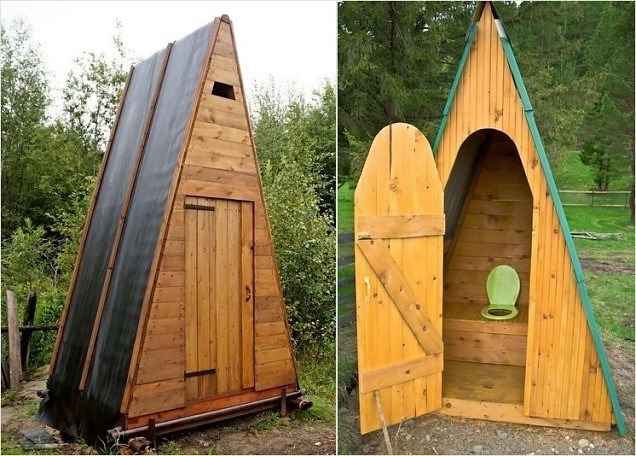
There are two rational grains in this solution:
- The slopes of the steep roof replace the walls;
- The unusual appearance of the building adorns the landscape.
Very often, the toilet becomes part of the hozblok. This solution allows you to place several rooms in one building. As a result, savings are achieved during construction (common walls) and the comfort of use is increased (a warm toilet is always at hand).

A solid combination of a latrine with a shower, lined with siding and covered with a hipped bituminous roof

A variant of a brick toilet interlocked with a shower cabin

Aesthetically not very successful combination in one outbuilding (toilet-shower) of a log house and a roof made of plastic slate

Some owners combine two toilets in the building: "for gentlemen and ladies."
How to build a simple toilet for a summer residence on your own?
Having decided on the waste disposal system (powder closet, cesspool, septic tank), you can begin construction.
Minimum cabin dimensions- width 1 meter, depth 1.4 meters and height 2.0 meters.
The basis of the structure, the step-by-step construction of which we will consider, is a wooden frame made of antiseptic bursa. It can be placed on a block foundation or on a shallow concrete "tape". A thick sheet of plywood or OSB board with a rectangular hole cut into it is attached to the frame from above.

Having assembled the base, the vertical racks of the frame and strapping bars are set according to the level.

Having made the frame, it is sheathed with plywood using a jigsaw and a screwdriver.

The next step is the installation of the roof rafters. They are made from a dry beam with a section of 5x10 cm, cutting it into the upper belt of the wall binding. In the upper part, the bars are connected to a horizontal ridge board.

Having completed this stage, the rafters are sheathed with plywood. This is the best base for shingles that will lay on the roof.

Having finished with the roof, proceed to the assembly of the "podium" frame. It will have a powder-closet storage tank and a hole for a seat with a lid.

The toilet door is assembled from a tongue-and-groove board fastened with transverse strips for greater rigidity.

After tying the doorway with a beam, a door leaf is attached to it with the help of hinges. Finishing operation - painting the closet booth from the outside and from the inside.

In conclusion, let's say that we considered the option of building a summer outdoor toilet. For the winter season, the walls from the inside must be insulated with foam plastic (minplate) and sheathed with any sheet material (plywood, OSB, board, plastic).
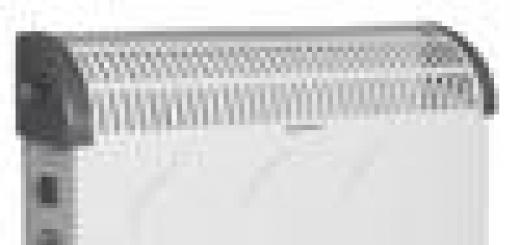
If you decide to bring light into the booth, then along the way you can increase the comfort of use at minimal cost. Install an electric fan heater. In just a few minutes, it will warm the air to a positive temperature.
Often, the first thing a person thinks about after buying a plot is how to make a simple outdoor toilet in a country house with their own hands and ready-made drawings will come in handy here, as well as a detailed description of all stages of construction, tips and nuances.
One of the most important and vital buildings in a summer cottage or garden plot is the toilet. The need for a simple construction arises within a few hours after arrival. And even if the owners already have a bathroom in a cozy house, outdoor amenities will never be superfluous.

A toilet in a summer cottage is easy to build with your own hands
The simplicity of the design allows even a person without much building experience to equip a toilet for a summer residence with their own hands. And if you connect fantasy, then a house for thinking about
fit perfectly into the design of the site and, perhaps, even become its decoration.
Which toilet to build: types and features
Actually, there are only two options here: with or without a cesspool.
- A pit latrine is a simple, time-tested structure that consists of an equipped cesspool and a toilet house above it. As the pit is filled with sewage, they clean it manually or order a sewage machine.
And sometimes they just move the house to another place. The old pit is buried, and after 6-7 years its contents will finally rot and you can put the toilet back again.
- Backlash closet - a kind of street toilet with a sewage pit, but with the difference that it must be airtight. Such a toilet has to be built if it is located close to the house, a water source, or when groundwater is high.

Scheme: how the backlash closet works
- A toilet without a cesspool or a powder closet is equipped if the groundwater is very high or if the toilet is not used much. In this case, anything can be a container for collecting sewage, except for a pit (bucket, barrel, plastic tank). The required volume determines the intensity of using the bathroom.
After each trip to such a toilet, sewage is sprinkled with dry peat, sometimes sawdust or ash is used, so a box for “masking powder” should be provided in the house. After filling, the container is removed manually, and the contents are evacuated to the compost pit. If sewage was sprinkled with peat, then after a while they become a wonderful fertilizer.

Toilet without a cesspool (powder closet)
Important! If the groundwater lies below 2.5 meters, any type of toilet can be built, but if they are located higher, then the cesspool will have to be abandoned.
Where to build a toilet
For pit latrines, there are a number of sanitary and hygienic standards and restrictions on which their location on the site depends.
Minimum distances from the toilet to other objects:
- To water sources (wells, wells, lakes, rivers) - 25 m;
- To houses, cellars - 12 m;
- To a summer shower or bath - 8 m;
- To the nearest tree - 4 m, and to shrubs - 1 m;
- To the fences - at least 1 m.

Scheme: the correct location of the toilet relative to other buildings in the summer cottage
Important! When choosing a construction site, it is worth considering not only the objects located on your own site, but also those located on the neighboring one.
So that summer evenings on the terrace are not spoiled by amber, the place is chosen taking into account the wind rose. If the site is located on a slope, it is better to put the toilet at the lowest point.
Construction of a cesspool
After selecting and preparing the site, they begin to dig a cesspool. As a rule, it is square in shape, at least 2 meters deep.
The cesspool is of two types:
- Sealed. The bottom of such a pit is concreted, reinforced before pouring, and so that the reinforcement does not drown in concrete, it is placed on pegs. The walls are also sealed, puttied with a mortar or the seams are covered with bitumen.

Sealed toilet pit
- Absorbing. It is better to dig such a hole to the sand, then the liquid fraction of sewage will quickly go into the ground. The bottom is covered with a layer of large rubble or pebbles.

Absorption pit design
There are several ways to strengthen the walls of a cesspool:
- Brickwork;
- concrete structure;
- Ready reinforced concrete rings;
- Plastic tank.
From above, the pit is covered, with bars, slate or concreted, leaving only the area under the toilet seat open, and they begin to assemble the toilet house.
Construction of a toilet house
The optimal dimensions of a country toilet are 1 × 1.5 m, height - 2.2-2.5 m. Otherwise, it will simply be inconvenient, especially for people with large shapes. It is not necessary to make toilet drawings on your own, if there are no special requirements and ideas, you can use ready-made ones.
First of all, the scheme is convenient in that it allows you to correctly calculate the amount of building materials and the preliminary cost of a yard bathroom.

Building a toilet over a cesspool (correct placement scheme)
frame base
The toilet house is recommended to be pushed forward 2/3 above the cesspool, thus providing access to it for cleaning behind the back wall of the structure.
The stability of the building can provide a shallow foundation. Waterproofing is laid between it and the frame, 1-2 layers of roofing material. But for light construction from wood, it is not required at all. The base is enough to install on concrete blocks.
You can also put four supporting pillars. To do this, four pits about 60 cm deep are dug in the corners of the future structure, up to 1 meter in soft soils, and asbestos pipes are lowered into them. The pit is filled with cement mortar by a third. After that, a support beam is installed in the pipe, and the pit is completely filled with concrete.

Installing the toilet base on concrete blocks
Frame assembly
For the construction of the frame, it will be enough bars with a section of 50 × 50 or 80 × 80 mm, it is not advisable to take a larger material.
- First, a rectangular support with a jumper is assembled, from which the front wall of the toilet seat will rise, and screwed to the foundation or support posts. A board is laid on top. The thickness of the floor board must be at least 3 cm.

Construction of a wooden frame for a toilet
- The frame of the front, rear and side walls is assembled from the timber. In this case, the front wall should be at least 10 cm higher than the back wall, this will provide the necessary slope of the roof.
- For greater structural strength on the side and rear walls, it is recommended to make diagonal jibs.
- On the front wall, it is necessary to make a reinforcement for the door of the appropriate size and make a hole for the window.
- The wall frames are fixed on the base with metal corners, a strapping is made on top and at the level of the toilet seat.

Strengthening the frame of the toilet with metal corners
- The next step is to assemble the toilet seat frame and sheath it, unless alternative options are provided, for example, a floor-mounted toilet.
Frame sheathing
Sheathe the frame with wooden boards. The vertical arrangement allows you to significantly save material, and the horizontal one imitates a log house and looks more interesting. The boards are tightly fitted to each other and attached to the base. Instead of wood, they also use corrugated sheets, slate, or any other material that matches the construction budget.

Toilet frame upholstery
Advice! It is desirable to treat all wooden structural elements with a special antibacterial impregnation, which will protect the material from moisture and pests, and then varnish or paint
Roof
The roof should not protrude beyond the walls by more than 30 cm. Installation begins with fixing parallel boards at a short distance. After that, the visor is sewn from below, the boards are attached from the outside around the perimeter. A layer of waterproofing is laid on the prepared base, usually it is roofing material, after which the structure is covered with any roofing material (slate, metal profile, bituminous tiles).

A simple flat roof is enough for a toilet
Summer residents who are not satisfied with the standard scheme of the house can find drawings of more interesting options, make it on their own or purchase ready-made toilet houses, they are assembled according to the type of designer, and for convenience, instructions and all accompanying drawings must be attached to them.
Exhaust ventilation
Exhaust ventilation in the country toilet - is a pipe that removes odors from the cesspool. Its lower edge is led into the pit, and the upper one should rise above the roof by at least 20 cm.

Arrangement of ventilation of a country toilet
A plastic pipe with a diameter of 100 millimeters is suitable for arranging ventilation. It is attracted to the back wall from the inside or outside of the building and fixed with iron clamps. To increase traction, a deflector nozzle is installed on the head.
Toilet door installation
Doors are installed with ordinary wooden, ready-made plastic or home-made ones, from the material with which the frame was sheathed. Hang the door on 2 hinges. The method of closing, in principle, can be any, traditionally it is a latch, latch or hook, outside and inside. It is better to refuse from more tricky locking systems, for example, with latches, since their mechanism will be exposed to moisture and quickly rust.

Two hinges are enough to install the door
Lighting
For a more comfortable operation of amenities, it is better to take care of their lighting in advance. It can be a wall flashlight that runs on battery power. Alternatively, you can bring the wiring and connect a small lighting device.

Country toilet lighting options
And during the day, a small window will illuminate the interior. It is usually cut out above the doors or at the top of the door, but there are actually more options, from figured windows on the walls to a transparent roof.
Advice! The latrine will last longer if you do not throw toilet paper and other hygiene or household items into it, so be sure to have a bucket in the toilet. If dimensions allow, it is convenient to install an ordinary washbasin with a hanging spout here, especially since you already have a rowing pit.
Powder closet: features of the building
The absence of a cesspool is the main difference in construction. But there are some differences in the design of the house. You will have to think about a way to extract the container in which sewage is collected.

Scheme: powder closet device
The door is usually equipped with the back wall of the house or the front wall of the toilet seat. Inside the booth, a special box is installed for peat (ash, sawdust). Ventilation is also indispensable here, only the pipe does not fall into the pit, but directly under the toilet seat.
1.
2.
3.
4.
5.
The only option to provide comfortable accommodation in a country house, is a cesspool for a toilet, into which it will be possible to divert the waste products of people living permanently or temporarily in a country house or cottage.
If there is water supply in the country house, the cesspool for the toilet is one of the necessary treatment facilities that can ensure the maintenance of order, cleanliness and the ecological state of the adjacent territory.
Toilet pit options
In practice, in the absence of a central sewage system, the following options are used to equip treatment facilities in a suburban area:- storage system of drains;
- local sewerage with biotreatment.
Do-it-yourself cesspool with an earthen bottom
The simplest arrangement of a cesspool is a pit with an earthen bottom, which acts as a natural filter. This option is currently most in demand if the owner of the dacha intends to build a toilet with a cesspool with his own hands, subject to low water consumption, since then it will not be necessary to use the services of sewers often.
The main disadvantage of cesspools without sealing is that the absorption of liquid by the soil occurs rather slowly, and when a large family lives permanently in the country, it cannot cope with significant volumes of sewage and sewage. When planning a toilet in a private house, this must be taken into account.
According to the requirements of SNiP, such a do-it-yourself toilet pit is capable of processing a maximum of one cubic meter in a natural way during the day.
It should be noted that earth pits are potential environmental pollutants, especially when fecal effluents are mainly dumped into them. Wastewater in cesspools is recycled by bacteria living in the soil. But in those cases when the volume of sewage exceeds the volume with which the natural biofilter is able to cope, the effluents in an unchanged, and therefore unprocessed form, penetrate into the deep layers of the soil.
As a result, contaminated liquid mixes with underground water layers and renders well water unusable. As a result, a toilet located in a summer cottage becomes a source of potential danger for the environment.
In order to prevent contamination of drinking water sources, it is mandatory to follow the rules governing the placement of sedimentation tanks. In particular, they contain requirements on how to properly dig a hole for a toilet (read also: "").
The minimum distance from the cesspool to the artesian well should be:
- on clay soils - 20 meters;
- on loam - 30 meters;
- in the presence of especially light soils (sandy and sandy) - 50 meters.
Sealed storage structures
They are various sealed tanks made of various materials:- concrete;
- bricks;
- tarred wood;
- finished reinforced concrete products;
- plastic containers of various sizes.

Also, before digging a hole for a toilet, it is necessary to consider the possibility of free access of special vehicles to it for pumping out waste.
You need to know how to dig a hole for a toilet, observing the accepted placement rules for neighboring sites and some objects:
- distance to the border with neighbors - at least 2 meters;
- to a residential building - at least 5 meters.
There exists important nuance: in order to ensure the explosion safety of a sealed pit, it is necessary to have natural ventilation, which is equipped with a 100 mm pipe at a distance of 600 mm above the ground.
Its structural solution is as follows: sealed brick or concrete walls are laid out in a dug pit (or ready-made tanks are used) and bottom drainage is created using fragments of cinder blocks or bricks, stones, gravel and other materials. Such a filter performs a dual function: it not only mechanically cleans the waste liquid, but also creates the necessary environment for the growth of bacteria, which accelerate the decomposition of fecal waste.
Creation of a local sewer
The fastest, but most expensive option for equipping a sealed cesspool in a summer cottage is the use of factory-made plastic containers. Before properly digging a hole for a toilet, they decide on the size of the tanks. After that, they dig a pit and prepare the base for the container - a sand cushion or concrete.To prevent the light tank from being pushed out by the movement of heavier soils, the plastic tank should be securely fastened to the created base. Then the tank is covered with earth and rammed. It is desirable to make the entrance of the sewer pipeline into the tank non-rigid and movable in order to reduce the likelihood of depressurization of the joint during natural soil settlement.
The second popular, but time-consuming method is the construction of concrete rings. Before digging a hole for a toilet, they are determined with the size of these products. You will need a truck crane to sequentially lower 3 rings into the prepared pit. They are usually 0.9 meters high and 0.7 to 2.0 meters in diameter. The joints between them are sealed with concrete mortar. From the inside, the structure is covered with bitumen and covered with a lid with a hatch for pumping sewage, and covered with earth.
The toilet is the first structure erected by the owner of the land.
If at first you can still somehow do without a house by building a summer kitchen, then the septic tank cannot be attributed to secondary structures.
For many summer residents, it is with his device that the acquisition of building experience begins.
How to build a country toilet? If you want to create a building that has an original design, you must determine the dimensions of the building. You can take a typical drawing, based on individual needs, develop a project that suits you. 
Approximate plan of construction and design work looks like that:
- Start with creating a frame, put the dimensions of the building on the drawing. Calculate the amount of materials needed to build it. On the plan, indicate the section of wooden beams and the dimensions of the boards.
- On the drawing, be sure to reflect how it will be cut facing material. The scheme should have a calculation for one side wall of the building, as well as for its front and rear walls. Don't forget to add building materials for the other side wall. Optimal toilet width 1.2 m, height - 2 m.
- If you want to expand the building, make adjustments into the drawing. The front wall, like the back, is made rectangular. Lateral - trapezoidal, this allows you to achieve the desired slope of the roof. In one of the walls of the building, it is necessary to cut a window, through which light will penetrate into the toilet in the country house. In addition, the window is necessary for ventilation of the room.
- floor covering made from boards thick 50 mm, then the village toilet is sheathed with a sheet of OSB. The boards are installed on a base of timber, nails are used to connect the parts of the structure. In order to increase the strength of the building, all elements are connected into a groove. Its depth must be at least 50 mm.
- Make a door. Practice shows that the optimal dimensions 1.95x70.5 cm. You can make toilets for summer cottages from edged boards, often construction is carried out from OSB boards. When erecting a roof, lay the rafters, there should be a step of 40 cm between them. Buy boards to make them 100x50 mm. Nail them to the frame, the connection is made with nails. You can cover the roof of the toilet with slate or profiled sheets.
Keep proportions. Remember that an increase in the standard size will entail additional costs for the purchase of building materials.
A standard drawing can be taken as the basis for a wooden toilet. If you wish, country toilets can be made according to individual sizes.
Drawings and design of the birdhouse-type toilet

Regardless of which toilet you choose, it will require a cubicle. « birdhouse » - one of the most popular options.
- In order to make the frame and floor, buy boards. It is best to choose larch lumber, then the structure will be especially durable. On the doors, crate and walls, you can put a pine board. All parts of the structure should be covered with an antiseptic.
- Make a foundation 1 × 1 m, put a forty board on the floor. The front wall has a height of 2 m, and the rear 2.3 m. When building, be sure to use a level.
- When the frame is ready board the toilet. Install doors, after that you can proceed to work on the device of the roof. Completes the process of performing outdoor work.
If you are going to make a "birdhouse" by equipping it with a cesspool, make a foundation. Concrete blocks can be used for this purpose. 20x20x40 cm. Cover the roof with a profile sheet, and make a ridge from a bent strip of galvanized steel.
Drawings and design of the toilet type "hut"
« hut » is another popular option.

- Assemble the front wall first, and then go to the back. The easiest way to make a building is from a cut pine board with a thickness 30 mm, use self-tapping screws or nails for fastening.
- Install transverse and longitudinal beams, and then spacer. Make a cross member of the pedestal, be sure to attach it to the back wall, do not forget about the spacer beam.
- After you finish working on the frame, boards sew up the base of the floor. Make a platform, and then proceed to the sheathing of the slopes. After that, you can collect hang a door to the country toilet.
Drawings and design of the "Teremok" type toilet
For regions in which winters are snowy, the building is ideal « teremok » . Such a toilet is perfectly protected from the wind. The shape is unusual, you can make such a structure from improvised materials.

Pay attention to the shape of the door . Its upper end has a rounded shape, so construction will take more time.
Construction may seem like a daunting task for beginner builders. Pay attention to the geometry of the corners, then the building will be symmetrical.
Powder closet
Powder closet is another construction option. Usually, a do-it-yourself country toilet is made in places where groundwater comes close to the surface. The design differs in that it does not have an underground storage for waste.
Powder closet is great for giving. But the house in which year-round living is planned is best provided with a septic tank.
- The foundation is concreted, the toilet cubicle can be of any shape.
- Inside the building, a pedestal is made with a hole into which a waste container is inserted.
play closet
Backlash closet is made both inside houses and on the street.
- The toilet is cleaned with the help of sewage trucks, this is done 1 time per season.
- The cesspool is made airtight, this required condition which should be observed during the construction of the building.
The toilet cubicle can be of any shape.
shower-toilet
A toilet-shower for a summer residence is a building that combines two rooms under one roof.
- A partition is being erected between the toilet and the shower, each section has its own door. Height and width of the building - 2 m, length - 3 m.
- The upper and lower strapping can be made from timber 100×100 mm, and for vertical supports - timber 50×100 mm. Buy timber in sufficient quantities, should be done 24 supports.
- Also, do 12 blanks 200 cm long. They will go to the installation of roof slabs, use a beam with a section 50x100 mm.
Let's start building
Materials and tools
Before starting work, buy lumber in advance.
- For the construction of the frame, purchase a bar. Pay attention to its cross section, the best option — 100 x 100 mm, to increase the strength of the building, you can buy lumber with a section 150 x 150 mm.
- To trim the toilet you will need an edged board not less than 20 mm thick.
- Roof battens required 50×20 mm, and a grooved board will go to the floor 40×150 mm.
You can easily replace the sheathing board by purchasing OSB boards or sheets of waterproof plywood. If you opted for OSB, then the slats can be cut from these plates.
You will need the following tools:
- hammer, screws and nails;
- shovel and bucket;
- pliers;
- perforator or impact drill;
- brush for applying stain and paint;
- containers for solutions and paint.
How to choose a seat
Determine the place where you plan to make a toilet. Its remoteness from the house and other buildings depends on whether it will have a cesspool, or the building will be made without it.
Remember that construction should not interfere with neighbors, do not forget to indent from the fence by 1 meter. The door should open towards your yard. When digging a cesspool, leave access roads for a sewage truck.
Pit toilet
Most of the restrictions relate to the construction of cesspools. They must be securely isolated to prevent environmental pollution.

- The pit should be located in 25 m from water source. It can be a well, a well or a reservoir. The rule also applies to water sources located in neighboring areas.
- From the cesspool to the basement or cellar there should be at least 12 m to the bath or home - 8 m. To buildings that contain animals, at least 4 m. Pay attention not only to the location of the buildings on your site, but also on the neighboring one. This will help avoid conflict situations.
Before starting construction, it is necessary to select the internal structure of the toilet. The building can be with a cesspool and without it.
If groundwater comes close to the surface, being above 3.5 m from the surface, you can only build without a pit. Otherwise, waste products will be found in the water.
If groundwater comes close to the surface, being above 3.5 m from the surface, you can only build without a pit.
Similar restrictions are imposed on buildings built on shale rocks and in areas with natural cracks. Consider the water level in the spring when the snow melts. The lowest point of the cesspool should be 1 m above the maximum water level in spring.
If the groundwater is deep, then any type of garden toilet can be made on the site. The optimal volume of the pit is 1.5 cubic meters; it can be located under the building or away from it.
The cesspool can be:
- round shape;
- square shape.
In the first case, concrete rings are used for its arrangement. In addition, the walls can make a toilet in the country can be made of brick and rubble stone. But remember that this option will require labor, time and certain financial investments.
- Pay special attention tightness of the bottom part and walls. At the bottom, a castle is made from a layer of clay. It is compacted, the layer thickness should be at least 30 cm. If there is no desire to work with clay, the bottom can be poured with concrete.
- Be sure to do bituminous waterproofing.
- Inside the toilet make a hatch, or leave a few boards on the floor loose. You can choose a design in which the hatch is placed outside the toilet.
- The toilet is recommended to be equipped ventilation system. When filling the pit by 2/3 of the volume, the contents should be pumped out.
Detailed instructions for building a cesspool from tires:
Options without a hole
It is much easier to build a wooden toilet without a cesspool. Waste will be collected in a sealed container.
There are several types of such toilets, but the differences relate only to the way waste is processed.
- Microorganisms do this in dry closets, and special substances in chemical installations.
- In the powder closet, the waste is sprinkled with powder, which can be used as peat, sawdust or ash.
Building a house
When the work on arranging the cesspool is completed, you can proceed to the construction of the foundation.
It must be stable, and its reliability also matters. These are the main points to pay attention to.
If windy weather is often observed in the region, it is better to use metal pipes as a base. They must be buried in the ground, and the bars should be installed inside. So the structure will be further strengthened.
If windy weather is often observed in the region, it is better to use metal pipes as a base.
The frame is made from wooden beams. For the base, buy a larger section of lumber, and for load-bearing elements, you can choose thinner bars. For the device of the opening door, take a bar 100 × 100 mm.
- Saddle the base first by connecting the bars with nails. To make it easier to work, the bars can be pre-fastened with thin strips. Reinforce the base with stiffeners. For this purpose, use lumber with a smaller cross section. It is very good if the frame and stiffeners are one piece.
- For roofing at the top of the frame make a crate. Krusha can be covered with slate, you need one sheet. In order to fix it, fill the strips on the facade and rear of the booth. Fasten the bars at the bottom of the frame, they will become the basis for the floor. After that, you can proceed to the construction of walls. Sheathe them with a board, this is the best option. In addition, chipboard or plywood sheets can be used.
- Make a door. After attaching the canopies, install it in the opening.
- Cover the roof with slate or other material.
- If you wish, you can paint the toilet.
How to make ventilation
 There are the following options:
- Leave the building as is. In this case, the air in the cabin will move by itself.
- Forced ventilation. It is based on the installation of a fan.
You can choose any option for organizing the hood, but each of them requires the presence of ventilation holes in the walls. We are talking about supply and exhaust channels. A mandatory requirement will be the arrangement of the hood over the cesspool.
Forced ventilation is more efficient, it quickly removes unpleasant odors from the toilet. But the organization of such a system will require the owner suburban area certain financial costs.
To organize forced ventilation, you need to buy the following:
- fan;
- switches;
- the wire.
Forced ventilation quickly removes methane, but it is rather difficult to assemble such an installation. If you want to keep the air in the toilet always fresh, this option will be the most suitable. But without electricity, such an installation will not work.
The natural method of ventilation is good because it does not require additional equipment.
In order to make forced ventilation, install an exhaust hood in the pit. It is required so that the gas does not enter the booth, but is taken out into the street.
Make an exhaust pipe. To do this, buy a product whose diameter is at least 10 cm. The length of the pipe depends on how deep the hole is made in the toilet. To work, you will need an impact drill, in some cases you can not do without a hammer drill. The choice of tools depends on what material the booth is made of.
When laying a pipe in the ground, one should not forget about its protection; for this purpose, buy a casing. You will also need fasteners. Well suited those that are designed for drainage. In order to make the system work more efficiently, purchase a deflector.
The ventilation installation process consists of the following steps:
- Using the tool make a hole in a cesspool.
- Install fasteners according to the height of the building. Insert pipe and secure her.
- Install deflector.
Make holes in the walls of the toilet, placing them on opposite sides. Closer to the ceiling, there should be a place for the hood, and near the floor - an air inlet. Take the mesh and close the ventilation ducts, this will prevent debris from entering the toilet, and also protect the building from insects.
Install the fan by attaching it to the exhaust vent. For a standard toilet, the area of \u200b\u200bwhich does not exceed 2 m², a device whose power does not exceed 30 watts. Connect electricity by running a cable. Connect the fan, connect it to the mains.
Lighting
Toilet lighting options are as follows:
- air line;
- underground cable;
- solar-powered lanterns.
An overhead line is not the best solution if you do not want wires running over the area from the house to the toilet. Laying the cable underground is more aesthetically beneficial, but few people like to spend so much money and time on lighting in the toilet.
- you can use LED lights, which are designed to illuminate the garden. On sale there are products of different shapes and weights. They are inexpensive, every gardener can buy them.
- Since bright light is not needed, installing one flashlight will be enough for lighting. Buy a product, separate its upper part. Take a knife and cut off the clamps, then they will not interfere with you.
- Measure the protruding part of the lantern- one that is equipped with an LED and a battery. If necessary, you can easily replace the battery.
- Make a hole in the wall of the building appropriate size. Insert flashlight, lock his glue. For this purpose, silicone sealant is best suited.
How to make insulation
 The choice of a suitable insulation option must be determined in advance. Much depends on whether you plan to insulate the internal or external parts of the structure.
Planning work on inside, remember that space is limited. Choose a material that does not take up much space during installation. It is important that it reliably protects from frost, cold and wind. In favor of warming from the inside, it is also said that this type of laying the material will require less money. However, each case is individual.
Choosing external insulation, get ready for more painstaking work. Due to limited space, buy thermal insulation materials that are no wider than 75 mm. The ideal option would be the installation of mineral wool sheets. For its fastening, buy rectangular metal slats.
Due to limited space, buy thermal insulation materials that are no wider than 75mm.
- For waterproofing, you need a film, and for sheathing - drywall. It is best to opt for moisture resistant sheets.
- Get self-tapping screws and profiles. They will be required in order to make a quality mount.
- To putty the joints between the sheets, buy putty.
To choose the right amount of material, it is necessary to take into account the dimensions of the structure. Installation of insulation consists of the following steps:
- Take wooden slats. Make a crate by stuffing it on the wall in increments of 50 cm.
- Lay insulation sheets. Fix them with self-tapping screws, attaching to the crate. The material should be placed on the walls, do not forget about the ceiling.
- Put a film on the insulation, it is required to protect mineral wool from moisture. Fix the film with tape.
- Sheathe the insulation with moisture-resistant drywall. They are mounted on self-tapping screws, and mounted on a metal profile.
- Sheet joints seal with putty.
If you want, you can stick wallpaper or tiles on drywall.
You can build a toilet by hiring a construction team, or you can buy a ready-made one.
- The cost of "Hut" or "Birdhouse" starts from 6500 rubles.
- Hozblok with a toilet - from 12 to 18 thousand rubles.
- Delivery is available, the cost depends on the destination and region.
You can build a toilet in the country with your own hands very quickly. All parts of the structure made of wood should be treated with biocides. These drugs are effective against rot. Saturate the wood twice with a water-polymer emulsion. This tool is inexpensive, it will reliably protect lumber from moisture for many years.
- Sheeting with tongue and groove material will show all the advantages if you begin to stuff the board with a horizontal belt. Keep in mind that the ridges should be placed up and the grooves should be placed down. This will prevent the accumulation of moisture in the sheet pile. But the door is always sheathed, placing the boards vertically.
- If you are going to build, and the drawing involves the installation of curved sections, then sheathe them with a boat board. Nautical cladding will last much longer.
- In regions where there is a large amount of precipitation in summer and winter, such a sheathing will be an ideal option. But remember that in regions where strong winds prevail, it is better to give preference to sheet piling.
- If you have an electric jigsaw that has a swivel shoe, then you yourself will make a boat board from ordinary edged lumber.
- Treat all parts that face the ground or a cesspool with bituminous mastic or hot bitumen.
Conclusion
Building a country toilet with your own hands is a task that even novice builders can do.
- Before starting work, determine the place of construction and the level of groundwater, the type of construction depends on it.
- Make a drawing.
- Buy lumber in advance, prepare tools.
You can assemble a toilet for a summer residence in a few days.
This video describes in detail how to make a toilet for a summer residence:
The toilet is a building that is simply mandatory in the country. Often, it is from this building that the arrangement of the purchased site begins. At first, you can do without a bathhouse, and without a gazebo, and even without a house or at least a shed for storing inventory, but you can’t do without a toilet.
In order to comfortably spend time in the countryside, you certainly need to take up the construction of the toilet, and you can do all the work with your own hands. The instruction for the creation of such a strategically important facility for this site provides, first of all, the choice of a place.
Choosing a building site
Of course, everyone has the right to decide for himself where to start building such a specific facility, but there are a number of sanitary and hygienic standards and restrictions that you need to listen to when choosing the location of the toilet:
- Strict rules regulate the minimum allowable distance between, the water from which is used for domestic needs. The construction site must be at least 25 m away from water intake sources;
Note!
When choosing a site, you should take into account not only your own interests and the location of your well, but also take into account the interests of your neighbors and take into account the location of wells on their plots.
- Naturally, the arrangement of such a room is not carried out in the center of the site.. Try to choose a more modest remote place for such a construction. It is also forbidden to place a toilet on the very border of the site, you must step back from it by at least 1 meter;
- If the site is uneven and there is some difference in height, then the toilet should be located in the valley;
- Take into account also the wind rose in order to prevent the spread of unpleasant odors around the site.;
- For ease of use, consider in advance the convenience of accessing the sewer truck directly to the cesspool in order to clean it, because you still have to do this periodically.
The main types of toilets for summer cottages

Differences in the design of such buildings lead to the existence of a certain classification of toilets, which do not provide for the possibility of connecting to a central sewer. At the same time, the construction technology of any of them is not difficult and does not take much time.
You will independently cope with the construction of the following types:
- Toilet with a cesspool;
On the basis of these types of structures, many modifications were invented and built, differing in appearance, design, used building materials, which can seriously affect such a parameter as price.
The choice of one or another type of structure depends primarily on the level of groundwater on the site.
Advice. If this level is only 3.5 m and above, then only powder closet can be equipped on the site.
If the water level is much lower, then your choice is not limited to anything.
Cesspool design

Among our compatriots, a design of just this type has received maximum distribution. The operation of such a toilet is as simple as possible and consists in the accumulation of waste in a cesspool dug specifically for this.
If the pit is filled to 2/3 of its height, it is cleaned manually or by machine, or the structure is conserved and the toilet itself is moved to a new location, and the filled pit for the country toilet is covered with earth.
Pit arrangement

The construction of a country toilet begins with:
- A pit is dug under the country toilet in the shape of a square with a side of one meter and a depth of two;
- The bottom and walls of the dug pit must be strengthened. Concrete rings for a toilet in the country can act as such a strengthening, brickwork or stone masonry, it is also possible to use wooden logs or boards. The bottom is covered with a layer of rubble, which is carefully compacted;
Advice. If you are afraid for the tightness of the bottom of the pit, you can concrete it or lay it out with bricks.
- Next, the pit is sealed by caulking and plastering, this is necessary so that the waste does not penetrate into the groundwater.
Wooden toilet building

In fact, the answer to the question of how much a toilet costs for a summer residence directly depends only on the materials chosen for construction. In order to save money, most summer residents choose a tree for this. The construction process itself is based on the following questions:
| What shape to make a toilet? | Usually the frame of the toilet for giving has a rectangular or square shape. |
| What type of foundation should you choose? | The best option for the basis for such a structure is columnar foundation under the toilet in the country. The construction of the foundation consists in laying brick pillar at every corner of the building. Roofing material is laid over the pillars, which will become a waterproofing layer. |
| How to make a frame? | The frame structure is made of beams, which are pre-coated with primers and painted in order to protect them from decay processes. The assembly of the frame consists of the following steps:
|
| What is the roof made of? | As a material for roof sheathing, the same roofing material is most often used, which is covered with a sheet of slate on top. |
| How to sheathe a toilet in the country? | Often, wood, lining, siding, etc. are chosen as the material for lining the toilet. |
Advice. For more accurate and high-quality fastening of vertical beams to the base, metal plates and bolts are used.
For the convenience of using the toilet at night, lighting should be provided, for which electricity is supplied to the building. In the absence of electricity, a service such as renting a diesel generator for a summer residence can help you out. For lighting in the daytime, a window should be cut out in the casing above the door itself.
Note!
The shape of this window can be any, but holes of strict geometry or in the shape of a heart are often cut out.
Hood
The toilet is a structure that is inevitably associated with the occurrence of unpleasant odors. In order to minimize this side effect of such structures, professionals recommend equipping the seat with a tight-fitting lid, and besides this, an exhaust hood in the country toilet will also be useful.
To arrange ventilation, it is necessary to perform the following actions:
- The plastic sewer pipe is attached to the rear wall of the building with clamps so that one end of it is buried 1 dm into the cesspool;
- The other end of the pipe is brought out through a hole made in the roof;
Advice. The ventilation pipe should rise above the roof by about 0.2 m.
- The entry and exit points of the pipe must be carefully sealed, and in order to increase traction, a deflector nozzle should be installed on the pipe head.
Country backlash closet

This type of design is the best answer to the question of how to put a toilet in the country in the house if there is no sewage system. Backlash closet - a structure that is an intermediate option between a cesspool and a septic tank of industrial production and is perfectly exploited in structures such as country houses made of block containers, wood or stone. This type of toilet implies the presence of a sealed container.
Note!
The cesspool of this design is cleaned only with specialized equipment, so you should not choose a backlash closet if there is no company providing such services near your site.
Powder closet outside the city

This type of construction is as simple as possible, because it does not require digging a cesspool. The functions of such a pit are performed by a specialized container or barrel for a toilet in the country, which is located directly under the toilet seat, and when filled, they simply take it out.
To ensure partial removal of an unpleasant odor in such a structure, a box with sawdust, soil, peat or dry straw is placed next to the toilet seat. These materials can be powdered with waste after each visit to this facility.
Finally

As you have already understood, anyone who is at least a little familiar with construction is capable of building a toilet in their own country house. And if you are not a builder, then if you want to learn everything yourself, if you give it enough time and attention, and you will do the job carefully. And the video in this article will tell you even more about construction technology.
Excellent article 0